Azure-Advanced-Networking
M02-Unit 3 Create and configure a virtual network gateway
In this exercise you will configure a virtual network gateway to connect the Contoso Core Services VNet and Manufacturing VNet.
In this exercise, you will:
- Task 1: Create CoreServicesVnet and ManufacturingVnet
- Task 2: Create CoreServicesVnet Gateway
- Task 3: Create ManufacturingVnet Gateway
- Task 4: Create CoreServicesVM
- Task 5: Create ManufacturingVM
- Task 6: Connect to the Test VMs using RDP
- Task 7: Test the connection between the VMs
- Task 8: CoreServicesVnet to ManufacturingVnet
- Task 9: Verify that the connections connect
- Task 10: Test the connection between the VMs
Note: An interactive lab simulation is available that allows you to click through this lab at your own pace. You may find slight differences between the interactive simulation and the hosted lab, but the core concepts and ideas being demonstrated are the same.
Estimated time: 70 minutes (including ~45 minutes deployment waiting time)
Task 1: Create CoreServicesVnet and ManufacturingVnet
- In the Azure portal, select the Cloud Shell icon (top right). If necessary, configure the shell.
- Select PowerShell.
- Select No Storage Account required and your Subscription, then select Apply.
- Wait for the terminal to create and a prompt to be displayed.
-
On the toolbar of the Cloud Shell pane, select the Manage files icon, in the drop-down menu, select Upload and upload the following files azuredeploy.json and azuredeploy.parameters.json into the Cloud Shell home directory from the source folder C:\Allfiles\Exercises\M02
-
Deploy the following ARM templates to create the virtual network and subnets needed for this exercise:
$RGName = "ContosoResourceGroup"
#create resource group if it doesnt exist
New-AzResourceGroup -Name $RGName -Location "eastus"
New-AzResourceGroupDeployment -ResourceGroupName $RGName -TemplateFile azuredeploy.json -TemplateParameterFile azuredeploy.parameters.json
Task 2: Create CoreServicesVnet Gateway
-
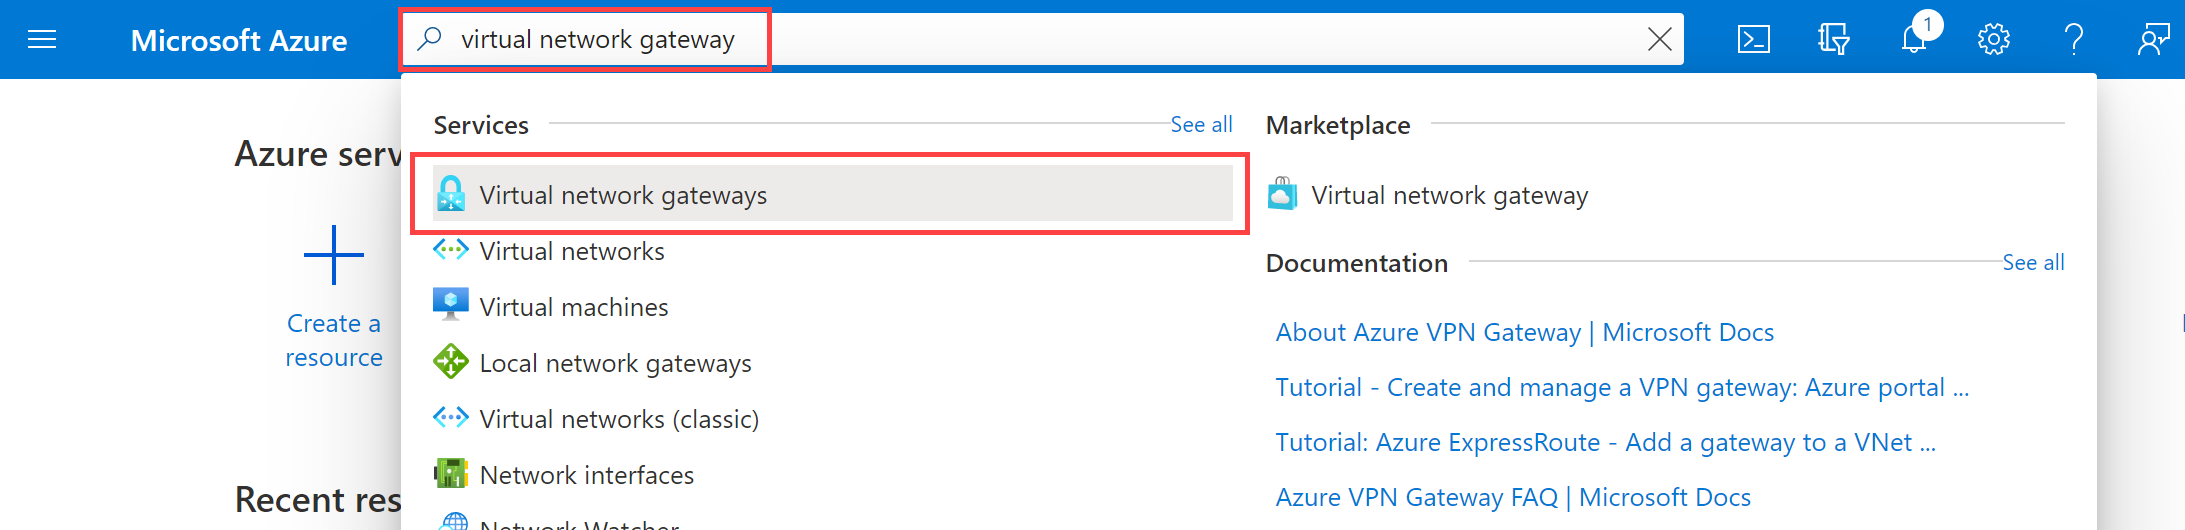
In Search resources, services, and docs (G+/), enter Virtual network gateway, and then select Virtual network gateways from the results.
-
In Virtual network gateways, select + Create.
-
Use the information in the following table to create the virtual network gateway:
Tab Section Option Value Basics Project Details Subscription No changes required Instance Details Name CoreServicesVnetGateway Region East US Gateway type VPN SKU VpnGw1AZ Generation Generation1 Virtual network CoreServicesVnet Subnet GatewaySubnet (10.20.0.0/27) Public IP address Public IP address Create new Public IP address name CoreServicesVnetGateway-ip Enable active-active mode Disabled Configure BGP Disabled Select Review + create Review your settings and select Create. Note:
When the ‘Deployment is in progress’ Go straight to the next task: Task 3 It can take up to 45 minutes to create a virtual network gateway.
Task 3: Create ManufacturingVnet Gateway
-
In Search resources, services, and docs (G+/), enter Virtual network gateway, and then select Virtual network gateways from the results.
-
In Virtual network gateways, select + Create.
-
Use the information in the following table to create the virtual network gateway:
Tab Section Option Value Basics Project Details Subscription No changes required Instance Details Name ManufacturingVnetGateway Region West Europe Gateway type VPN SKU VpnGw1AZ Generation Generation1 Virtual network ManufacturingVnet Subnet GatewaySubnet (10.30.0.0/27) Public IP address Public IP address Create new Public IP address name ManufacturingVnetGateway-ip Enable active-active mode Disabled Configure BGP Disabled Select Review + create Review your settings and select Create. Note:
When the ‘Deployment is in progress’ Go straight to the next task: Task 4 It can take up to 45 minutes to create a virtual network gateway.
Task 4: Create CoreServicesVM
-
On the Azure portal, open the PowerShell session within the Cloud Shell pane.
-
On the toolbar of the Cloud Shell pane, select the Manage files icon, in the drop-down menu, select Upload and upload the following files CoreServicesVMazuredeploy.json and CoreServicesVMazuredeploy.parameters.json into the Cloud Shell home directory one by one from the source folder F:\Allfiles\Exercises\M02.
-
Deploy the following ARM templates to create the VMs needed for this exercise:
Note: You will be prompted to provide an Admin password. Use Pa55w.rd1234abc
$RGName = "ContosoResourceGroup" New-AzResourceGroupDeployment -ResourceGroupName $RGName -TemplateFile CoreServicesVMazuredeploy.json -TemplateParameterFile CoreServicesVMazuredeploy.parameters.json -
When the deployment is complete, go to the Azure portal home page, and then select Virtual Machines.
-
Verify that the virtual machine has been created.
Task 5: Create ManufacturingVM
-
On the Azure portal, open the PowerShell session within the Cloud Shell pane.
-
- On the toolbar of the Cloud Shell pane, select the Manage files icon, in the drop-down menu, select Upload and upload the following files ManufacturingVMazuredeploy.json and ManufacturingVMazuredeploy.parameters.json into the Cloud Shell home directory from the source folder C:\Allfiles\M02.
-
Deploy the following ARM templates to create the VMs needed for this exercise:
Note: You will be prompted to provide an Admin password. Use Pa55w.rd1234abc
$RGName = "ContosoResourceGroup" New-AzResourceGroupDeployment -ResourceGroupName $RGName -TemplateFile ManufacturingVMazuredeploy.json -TemplateParameterFile ManufacturingVMazuredeploy.parameters.json -
When the deployment is complete, go to the Azure portal home page, and then select Virtual Machines.
- Verify that the virtual machine has been created.
Task 6: Connect to the Test VMs using RDP
-
On the Azure Portal home page, select Virtual Machines.
-
Select ManufacturingVM.
-
On ManufacturingVM, select Connect > Connect.
-
On ManufacturingVM | Connect, select Download RDP file.
-
Select keep if prompted.
-
Connect to ManufacturingTestVM using the RDP file, and the username TestUser and the password Pa55w.rd1234abc. After connecting, minimize the RDP session.
-
On the Azure Portal home page, select Virtual Machines.
-
Select CoreServicesVM.
-
On CoreServicesVM, select Connect > Connect.
-
On CoreServicesVM | Connect, select Download RDP file.
-
Select keep if prompted.
-
Connect to CoreServicesTestVM using the RDP file, and the username TestUser and the password Pa55w.rd1234abc.
-
On both VMs, in Networks, select Yes.
-
On CoreServicesTestVM, open a PowerShell prompt.
-
Use the following command to note the IPv4 address of the machine:
ipconfig
Task 7: Test the connection between the VMs
-
On the ManufacturingVM, open a PowerShell prompt.
-
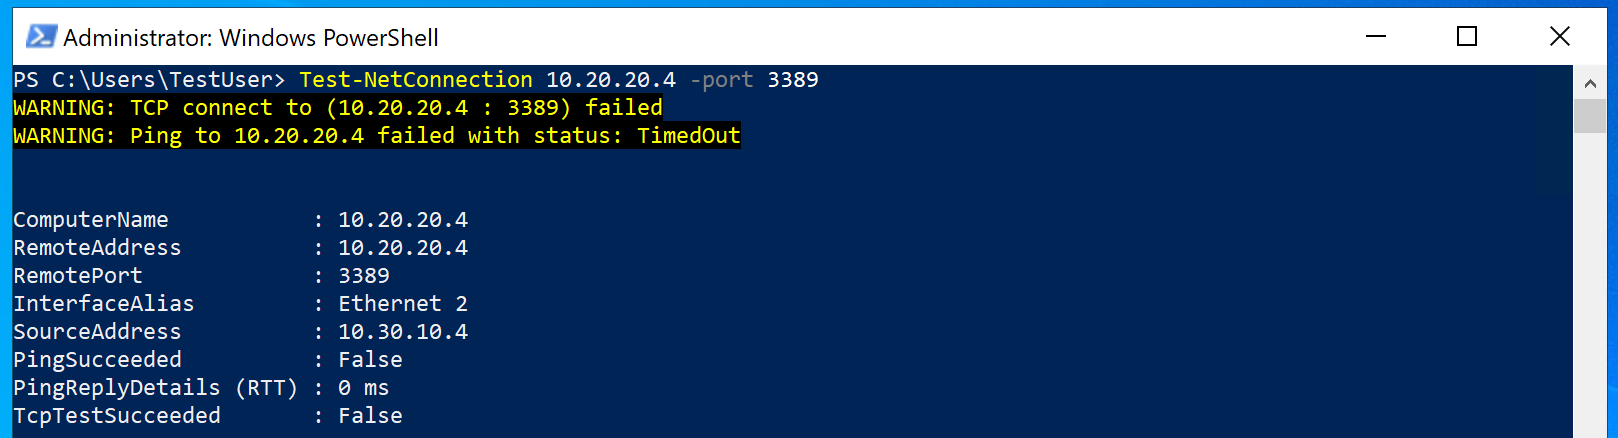
Use the following command to verify that there is no connection to CoreServicesVM on CoreServicesVnet. Be sure to use the IPv4 address for CoreServicesVM.
Test-NetConnection 10.20.20.4 -port 3389 -
The test connection should fail, and you will see a result similar to the following:
Task 8: Connect CoreServicesVnet and ManufacturingVnet together.
Note:
You will not be able to complete this configuration until the virtual network gateways are fully deployed.
-
In Search resources, services, and docs (G+/), enter Virtual network gateway, and then select Virtual network gateways from the results.
-
Under Hybrid Connectivity | ExpressRoute gateways
-
Select VPN gateways from the VPN gateway section.
-
In Virtual network gateways, select CoreServicesVnetGateway.
-
In the setting section select connections
-
Select + Add.
-
Use the information in the following table to create the connection:
Option Value Subscription Your subscription Connection type VNet-to-VNet Establish bidirectional connectivity Enable First connection name CoreServicesGW-to-ManufacturingGW Second connection name ManufacturingGW-to-CoreServicesGW Location East US -
Select next, on the setting tabs use the following values:
Option Value First virtual network gateway CoreServicesVnetGateway Second virtual network gateway ManufacturingVnetGateway Shared key (PSK) abc123 IKE Protocol IKEv2 Use Azure Private IP Address Not selected Enable BGP Not selected Subscription No changes required Resource group No changes required -
To create the connection, select Review and Create and then Create.
Task 9: Verify that the connections connect
-
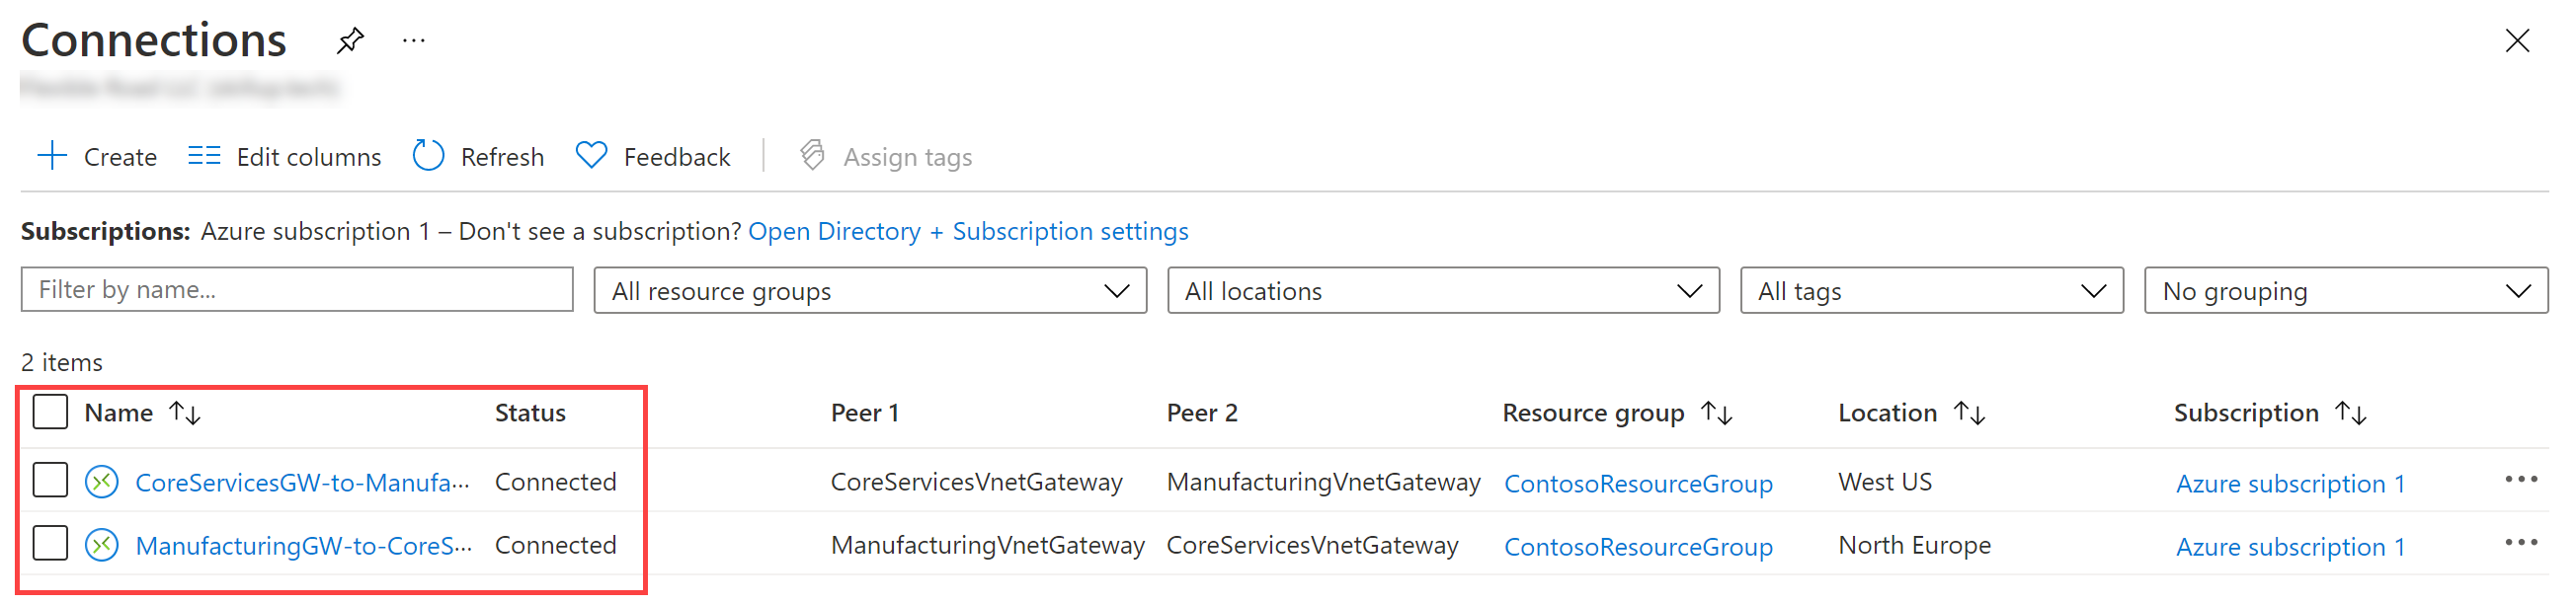
In Search resources, services, and docs (G+/), enter connections, and then select connections from the results.
-
Wait until the status of both connections is Connected. You may need to refresh your screen.
Note: This could take a couple of minutes.
Task 10: Test the connection between the VMs
-
On the ManufacturingVM, open PowerShell.
-
Use the following command to verify that there is now a connection to CoreServicesVM on CoreServicesVnet. Be sure to use the IPv4 address for CoreServicesVM.
Test-NetConnection 10.20.20.4 -port 3389 -
The test connection should succeed, and you will see a result similar to the following:

-
Close the Remote Desktop connection windows.
Congratulations! You have configured a VNet-to-VNet connection by using a virtual network gateway.