Azure-Advanced-Networking
M03-Unit 4 Configure an ExpressRoute Gateway
Deploy ExpressRoute gateways
To connect your Azure virtual network and your on-premises network via ExpressRoute, you must create a virtual network gateway first. A virtual network gateway serves two purposes: to exchange IP routes between the networks and to route network traffic.
Note: An interactive lab simulation is available that allows you to click through this lab at your own pace. You may find slight differences between the interactive simulation and the hosted lab, but the core concepts and ideas being demonstrated are the same.
Estimated time: 60 minutes (includes ~45 minutes deployment waiting time)
Gateway types
When you create a virtual network gateway, you need to specify several settings. One of the required settings, ‘-GatewayType’, specifies whether the gateway is used for ExpressRoute, or VPN traffic. The two gateway types are:
- VPN - To send encrypted traffic across the public Internet, you use the gateway type ‘VPN’. This is also referred to as a VPN gateway. Site-to-Site, Point-to-Site, and VNet-to-VNet connections all use a VPN gateway.
- ExpressRoute - To send network traffic on a private connection, you use the gateway type ‘ExpressRoute’. This is also referred to as an ExpressRoute gateway and is the type of gateway used when configuring ExpressRoute.
Each virtual network can have only one virtual network gateway per gateway type. For example, you can have one virtual network gateway that uses -GatewayType VPN, and one that uses -GatewayType ExpressRoute.
In this exercise, you will:
- Task 1: Create the VNet and gateway subnet
- Task 2: Create the virtual network gateway
Task 1: Create the VNet and gateway subnet
-
On any Azure Portal page, in Search resources, services and docs, enter virtual network, and then select Virtual networks from the results.
-
On the Virtual networks page, select +Create.
-
On the Create virtual networks pane, on the Basics tab, use the information in the following table to create the VNet:
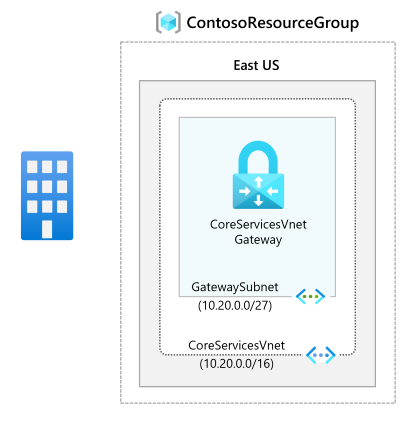
Setting Value Virtual Network Name CoreServicesVNet Resource Group ContosoResourceGroup (create new if required) Location North Europe -
Click Next.
-
On the Security blade.Click Next.
-
Select Next : IP addresses.
-
On the IP Addresses tab, in IPv4 address space, enter 10.20.0.0/16.
-
Delete the default subnet
-
Click + Add a subnet
-
In the Add subnet pane, use the information in the following table to create the subnet:
Setting Value Subnet purpose Virtual Network Gateway Gateway Subnet address space 10.20.0.0/27
Note that the subnet name will be automatically populated.
-
And then select Add.
-
On the Create virtual network page, select Review + Create.
-
Confirm that the VNet passes the validation and then select Create. to submit your deployment.
Task 2: Create the virtual network gateway
-
On any Azure Portal page, in Search resources, services and docs (G+/), enter virtual network gateway, and then select Virtual network gateways from the results.
-
On the Virtual network gateways page, select +Create.
-
On the Create virtual network gateway page, use the information in the following table to create the gateway:
Setting Value Project details Resource Group ContosoResourceGroup Instance details Name CoreServicesVnetGateway Region North Europe Gateway type ExpressRoute SKU Standard Virtual network CoreServicesVNet Public IP address Public IP address Create new Public IP address name CoreServicesVnetGateway-IP Public IP address SKU Standard Assignment Not configurable -
Select Review + Create.
-
Confirm that the Gateway configuration passes validation and then select Create.
-
When the deployment is complete, select Go to Resource.
[!Note]
it can take up to 45 minutes to deploy a Gateway.
Congratulations! You have successfully created a Virtual network, a gateway subnet, and an ExpressRoute Gateway.
Task 3: Clean up resources
Note: Remember to remove any newly created Azure resources that you no longer use. Removing unused resources ensures you will not see unexpected charges.
-
On the Azure portal, open the PowerShell session within the Cloud Shell pane.
-
Delete all resource groups you created throughout the labs of this module by running the following command:
Remove-AzResourceGroup -Name 'ContosoResourceGroup' -Force -AsJobNote: The command executes asynchronously (as determined by the -AsJob parameter), so while you will be able to run another PowerShell command immediately afterwards within the same PowerShell session, it will take a few minutes before the resource groups are actually removed.