Azure-Advanced-Networking
M04-Unit 4 Create and configure an Azure load balancer
In this exercise, you will create an internal load balancer for the fictional Contoso Ltd organization.
Note: An interactive lab simulation is available that allows you to click through this lab at your own pace. You may find slight differences between the interactive simulation and the hosted lab, but the core concepts and ideas being demonstrated are the same.
Estimated time: 30 minutes
The steps to create an internal load balancer, are very similar to those you have already learned about in this module, to create a public load balancer. The key difference is that with a public load balancer the front end is accessed via a public IP address, and you test connectivity from a host which is located outside your virtual network; whereas, with an internal load balancer, the front end is a private IP address inside your virtual network, and you test connectivity from a host inside the same network.
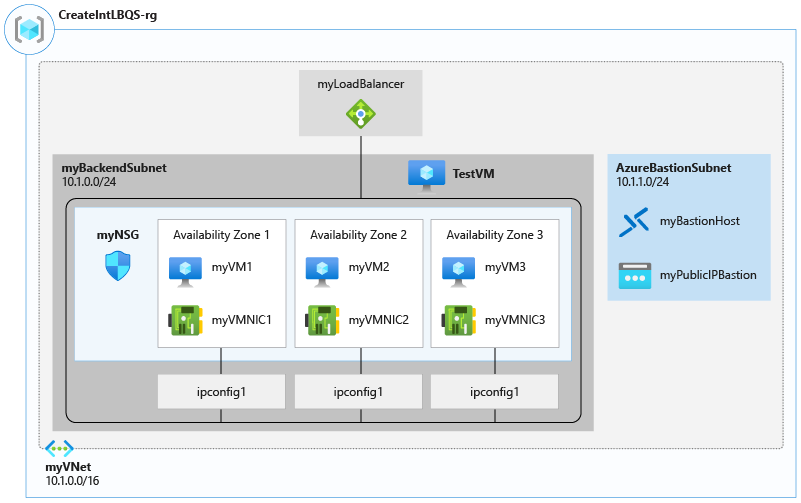
The diagram below illustrates the environment you will be deploying in this exercise.
In this exercise, you will:
- Task 1: Create the virtual network
- Task 2: Create backend servers
- Task 3: Create the load balancer
- Task 4: Create load balancer resources
- Task 5: Test the load balancer
Task 1: Create the virtual network
In this section, you will create a virtual network and a subnet.
-
Log in to the Azure portal.
-
On any Azure Portal page, in Search resources, services and docs, enter virtual network, and then select Virtual networks from the results.
-
On the Virtual networks page, select +Create.
-
On the Create virtual networks blade, on the Basics tab, use the information in the following table to create the VNet:
Setting Value Subscription Select your subscription Resource group Select Create new Name: IntLB-RG Name IntLB-VNet Region (US) East US -
Click Next.
-
On the Create virtual networks blade, on the Security tab Click Next.
-
On the Create virtual networks blade, on the IP addresses tab: In the existing Address space section, under Subnets, select the default link.
-
On the Edit subnet blade, under Subnet details: Change the Name to MyBackendSubnet.
-
Click Save
-
In the Address space section. Click Add a subnet
-
Create a subnet with the following Subnet settings (leave other settings with their default values):
Setting Value Subnet template Default Name MyFrontendSubnet Starting address 10.0.1.0 Subnet size /24 (256 addresses) -
Click Add
-
Click Review and Create. Let validation occur, and click Create again to submit your deployment.
Task 2: Create backend servers
In this section, you will create three VMs, that will be in the same availability set, for the backend pool of the load balancer, add the VMs to the backend pool, and then install IIS on the three VMs to test the load balancer.
-
On the Azure portal, open the PowerShell session within the Cloud Shell pane.
-
On the toolbar of the Cloud Shell pane, select the Manage files icon, in the drop-down menu, select Upload, and upload the following files azuredeploy.json, azuredeploy.parameters.json into the Cloud Shell home directory from the source folder C:\Allfiles\M04..
-
Deploy the following ARM templates to create the VMs needed for this exercise:
Note: You will be prompted to provide an Admin password. Use Pa55w.rd1234abc
$RGName = "IntLB-RG"

New-AzResourceGroupDeployment -ResourceGroupName $RGName -TemplateFile azuredeploy.json -TemplateParameterFile azuredeploy.parameters.json
Note It may take 10-20 mins to create these three VMs. Wait for the deployment to finish before moving to the next task
Task 3: Create the load balancer
In this section, you will create an internal Standard SKU load balancer.
-
On the Azure home page, in the search bar, enter Load, and then select Load balancers.
-
Select Load balancers , click + Create, then Standard Load Balancer.
-
On the Basics tab, use the information in the table below to create the load balancer.
Setting Value Subscription Select your subscription Resource group IntLB-RG Name myIntLoadBalancer Region (US) East US SKU Standard Type Internal Tier Regional -
Select Next: Frontend IP configurations.
-
Select + Add a frontend IP configuration
-
On the Add frontend IP address blade, enter the information from the table below.
Setting Value Name LoadBalancerFrontEnd Virtual network IntLB-VNet Subnet myFrontEndSubnet Assignment Dynamic Availability zone No Zone -
Click Save
-
Select Next : Backend pools.
-
Select + Add a backend pool
-
On the Add backend pool blade, enter the information from the table below.
| Setting | Value |
|---|---|
| Name | myBackendPool |
| Virtual network | IntLB-VNet |
| Backend Pool Configuration | NIC |
-
Under IP Configurations, select + Add.
-
On the Add IP configurations to backend pool blade.
-
Select the checkboxes for all 3 VMs (myVM1, myVM2, and myVM3), then select Add.
-
Back on the Add backend pool blade: Select Save
-
On the Create load balancer blade: Select Next : inbound rules
-
On the Inbound rules tab, under Load balancing rule: Select + Add a load balancing rule
-
On the Add load balancing rule page, enter the information from the table below.
Setting Value Name myHTTPRule IP Version IPv4 Frontend IP address Select LoadBalancerFrontEnd from drop-down list Backend pool Select myBackendPool from drop-down list High Avaialability Ports Unchecked Protocol TCP Port 80 Backend port 80 Health probe Select: Create new -
On the Add health probe pop-up blade: Enter the information in the table below.
Setting Value Name myHealthProbe Protocol TCP Port 80 Interval 5 -
Select Save
-
Back on the Add load balancing rule blade: click Save
-
Back on the Create load balancer blade: click Review + create
-
Wait for validation to complete.
-
Click Create
-
Wait for deployment to complete.
Task 5: Test the load balancer
In this section, you will create a test VM, and then test the load balancer.
Create test VM
-
On the Azure portal home page, select Create a resource, then virtual, then select Virtual machine (if this resource type is not listed on the page, use the search box at the top of the page to search for it and select it).
-
On the Create a virtual machine page, on the Basics tab, use the information in the table below to create the first VM.
Setting Value Subscription Select your subscription Resource group IntLB-RG Virtual machine name myTestVM Region (US) East US Availability options No infrastructure redundancy required Image Windows Server 2019 Datacenter - Gen 2 Size Standard_DS2_v3 - 2 vcpu, 8 GiB memory Username TestUser Password Pa55w.rd1234abc Confirm password Pa55w.rd1234abc -
Select Next : Disks, then select Next : Networking.
-
On the Networking tab, use the information in the table below to configure networking settings. Leave all other settings at their default settings.
Setting Value Virtual network IntLB-VNet Subnet myBackendSubnet Leave all other settings as default.
-
Select Review + create.
-
Select Create.
-
Wait for this last VM to be deployed before moving forward with the next task.
Connect to the test VM to test the load balancer
-
On the Azure portal home page, select All resources, then select on myIntLoadBalancer from the resources list.
-
Under Settings select Frontend IP configuration make a note of the Private IP address, or copy it to the clipboard.
-
On the Azure Portal home page, select Virtual Machines.
-
Select MyTestVM.
-
On MyTestVM, select Connect > Connect.
-
On MyTestVM | Connect, select Download RDP file.
-
Select keep if prompted.
-
Connect to MyTestVM using the RDP file, and the username TestUser and the password Pa55w.rd1234abc.
-
If prompted, in Networks, select Yes.
-
Select the Edge Explorer icon on the desktop to open the web browser.
-
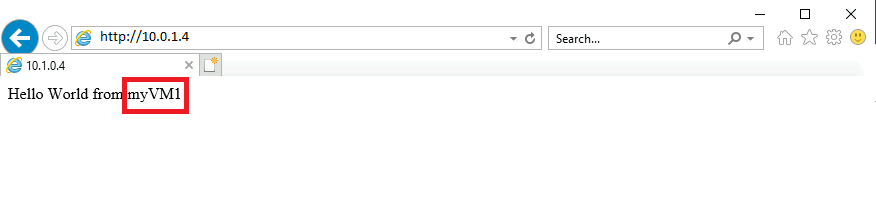
Enter (or paste) the Private IP address (e.g. 10.0.1.4) from the previous step into the address bar of the browser and press Enter.
-
The default web home page of the IIS Web server is displayed in the browser window. One of the three virtual machines in the backend pool will respond.
Clean up resources
Note: Remember to remove any newly created Azure resources that you no longer use. Removing unused resources ensures you will not see unexpected charges.
-
On the Azure portal, open the PowerShell session within the Cloud Shell pane.
-
Delete all resource groups you created throughout the labs of this module by running the following command:
Remove-AzResourceGroup -Name 'IntLB-RG' -Force -AsJobNote: The command executes asynchronously (as determined by the -AsJob parameter), so while you will be able to run another PowerShell command immediately afterwards within the same PowerShell session, it will take a few minutes before the resource groups are actually removed.