Azure-Advanced-Networking
M08-Unit 3 Monitor a load balancer resource using Azure Monitor
In this exercise, you will create an internal load balancer for the fictional Contoso Ltd organization, and use Azure Monitor Insights to view information about your internal load balancer. You will view the Functional Dependency View, then view detailed metrics for the load balancer resource, and view resource health information for the load balancer.
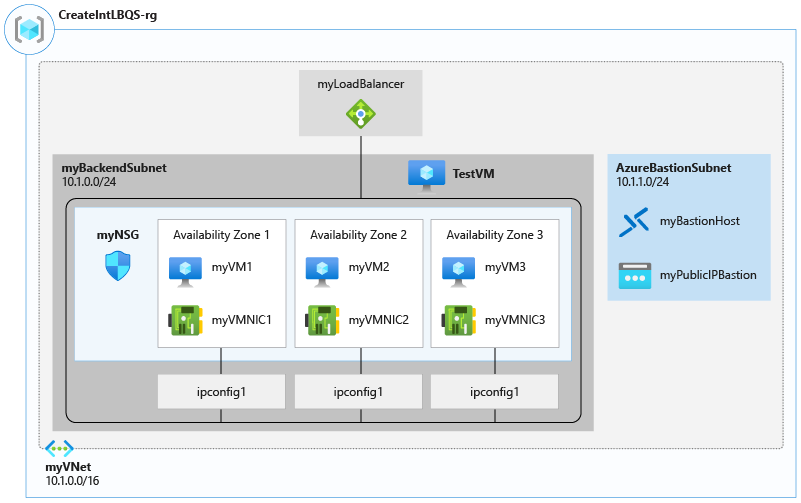
The diagram below illustrates the environment you will be deploying in this exercise.
In this exercise, you will:
- Task 1: Create the virtual network
- Task 2: Create backend servers
- Task 3: Create the load balancer
- Task 4: Test the load balancer
- Task 5: Use Functional Dependency View
- Task 6: View detailed metrics
- Task 7: View resource health
- Task 8: Clean up resources
Estimated time: 55 minutes
Task 1: Create the virtual network
In this section, you will create a virtual network and a subnet.
-
Log in to the Azure portal.
-
On any Azure Portal page, in Search resources, services and docs, enter virtual network, and then select Virtual networks from the results.
-
On the Virtual networks page, select +Create.
-
On the Create virtual networks blade, on the Basics tab, use the information in the following table to create the VNet:
Setting Value Subscription Select your subscription Resource group Select Create new Name: IntLB-RG Name IntLB-VNet Region (Asia) SouthEast Asia -
Click Next.
-
On the Create virtual networks blade, on the Security tab select the Enable Azure Bastion tickbox, then enter the information from the table below.
Setting Value Azure Bastion host name IntLB-Vnet-Bastion Azure Bastion Public IP address Select Create a public IP address On the Add a public IP address blade Select OK (keeping the default settings) -
Click Next.
-
On the Create virtual networks blade, on the IP addresses tab: In the existing Address space section, under Subnets, select the default link.
-
On the Edit subnet blade, under Subnet details: Change the Name to MyBackendSubnet.
-
In the Private subnet section: Untick: Enable private subnet (no default outbound access)
-
Click Save
-
Click Review and Create. Let validation occur, and click Create again to submit your deployment.
Wait for the deployment to complete. before going to Task 2
Task 2: Create backend servers
In this section, you will create three VMs, that will be in the same availability set, for the backend pool of the load balancer, add the VMs to the backend pool, and then install IIS on the three VMs to test the load balancer.
-
On the Azure portal, open the PowerShell session within the Cloud Shell pane.
-
On the toolbar of the Cloud Shell pane, select the Manage files icon, in the drop-down menu, select Upload and upload the following files azuredeploy.json and azuredeploy.parameters.json into the Cloud Shell home directory from the source folder C:\Allfiles\Exercises\M08.
-
Deploy the following ARM templates to create the VMs needed for this exercise:
$RGName = "IntLB-RG"

New-AzResourceGroupDeployment -ResourceGroupName $RGName -TemplateFile azuredeploy.json -TemplateParameterFile azuredeploy.parameters.json
When prompted for the adminpassword enter Pa55w.rd1234abc
Note It may take 10-15 minutes to create these three VMs.
Wait for all 3 VM’s to be deployed before moving to the next task
Task 3: Create the load balancer
-
On the Azure portal home page, select Create a resource.
-
On the search box at the top of the page, type Load Balancer, then press Enter (Note: do not select one from the list).
-
On the results page, locate and select Load Balancer (the one that says ‘Microsoft’ and ‘Azure Service’ under the name).
-
Select Create.
-
On the Basics tab, use the information in the table below to create the load balancer.
Setting Value Subscription Select your subscription Resource group IntLB-RG Name myIntLoadBalancer Region (Asia) SouthEast Asia SKU Standard Type Internal Tier Regional -
Select Next: Frontend IP configurations.
-
Select + Add a frontend IP configuration
-
On the Add frontend IP address blade, enter the information from the table below.
Setting Value Name LoadBalancerFrontEnd Virtual network IntLB-VNet Subnet myBackEndSubnet Assignment Dynamic Availability zone No Zone -
Click Add
-
Select Next : Backend pools.
-
Select + Add a backend pool
-
On the Add backend pool blade, enter the information from the table below.
Setting Value Name myBackendPool Virtual network IntLB-VNet Backend pool configuration NIC (default) -
Under IP Configurations, select + Add.
-
On the Add IP configurations to backend pool blade.
-
Select the checkboxes for all 3 VMs (myVM1, myVM2, and myVM3), then select Add.
-
Back on the Add backend pool blade: Select Save
-
On the Create load balancer blade: Select Next : inbound rules
-
On the Inbound rules tab, under Load balancing rule: Select + Add a load balancing rule
-
On the Add load balancing rule page, enter the information from the table below.
Setting Value Name myHTTPRule IP Version IPv4 Frontend IP address Select LoadBalancerFrontEnd from drop down list Backend pool Select myBackendPool from drop down list HA Ports Unchecked Protocol TCP Port 80 Backend port 80 Health probe Select: Create new -
On the Add health probe pop-up blade: Enter the information in the table below.
Setting Value Name myHealthProbe Protocol HTTP Port 80 Path / Interval 5 -
Select Save
-
Back on the Add load balancing rule blade: click Save
-
Back on the Create load balancer blade: click Review + create
-
Wait for validation to complete.
-
Click Create
Wait for deployment to complete.
Task 4: Test the load balancer
In this section, you will create a test VM, and then test the load balancer.
Create test VM
-
On the Azure portal home page, select Create a resource, then virtual, then select Virtual machine (if this resource type is not listed on the page, use the search box at the top of the page to search for it and select it).
-
On the Create a virtual machine page, on the Basics tab, use the information in the table below to create the first VM.
Setting Value Subscription Select your subscription Resource group IntLB-RG Virtual machine name myTestVM Region (Asia) SouthEast Asia Availability options No infrastructure redundancy required Image Windows Server 2019 Datacenter - Gen 2 Size Standard_DS2_v3 - 2 vcpu, 8 GiB memory Username TestUser Password Pa55w.rd1234abc Confirm password Re-Enter your password as above -
Select Next : Disks, then select Next : Networking.
-
On the Networking tab, use the information in the table below to configure networking settings. Leave all other settings at their default settings.
Setting Value Virtual network IntLB-VNet Subnet myBackendSubnet Public IP Change to None -
Select Review + create.
-
Select Create.
-
Wait for this last VM to be deployed before moving forward with the next task.
Connect to the test VM to test the load balancer
-
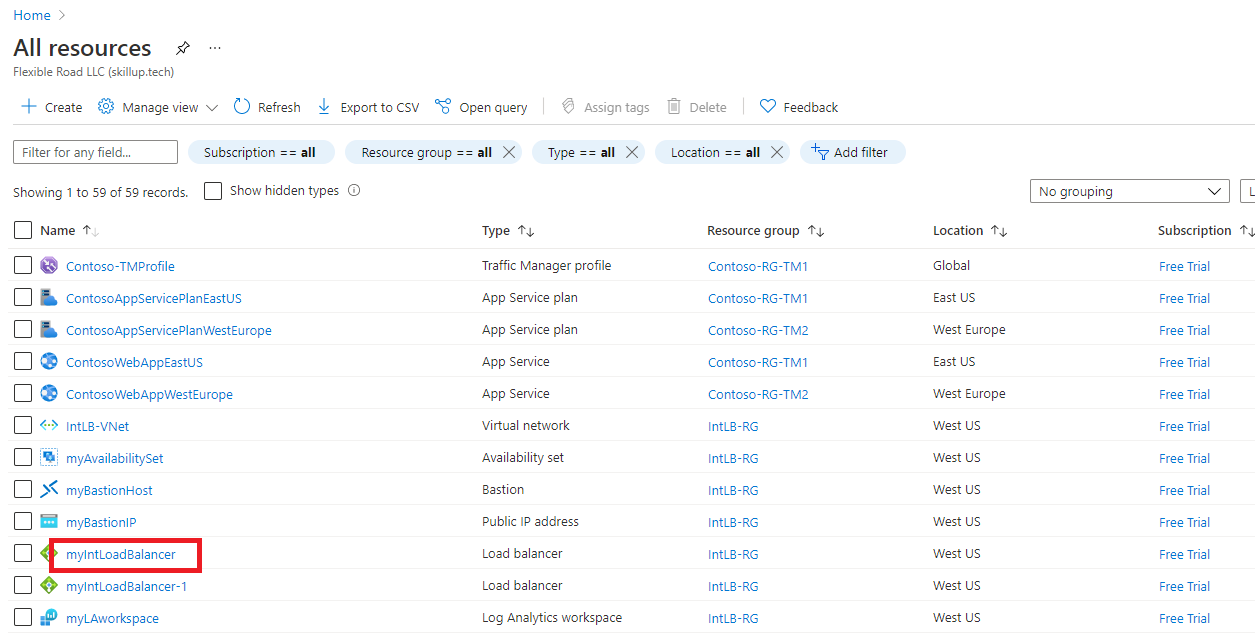
On the Azure portal home page, select All resources, then select on myIntLoadBalancer from the resources list.
-
On the Overview page, make a note of the Private IP address, or copy it to the clipboard. Note: you may have to select See more to see the Private IP address.
-
Select Home, then on the Azure portal home page, select All resources, then select on the myTestVM virtual machine that you just created.
-
On the Overview page, select Connect, then Bastion.
-
Select Use Bastion.
-
In the Username box, type TestUser and in the Password box, type Pa55w.rd1234?? (?? = your initials), then select Connect.
-
The myTestVM window will open in another browser tab.
-
If a Networks pane appears, select Yes.
-
Select the Internet Explorer icon in the task bar to open the web browser.
-
Select OK on the Set up Internet Explorer 11 dialog box.
-
Enter (or paste) the Private IP address (e.g. 10.0.0.7) from the previous step into the address bar of the browser and press Enter.
-
The default web home page of the IIS Web server is displayed in the browser window. One of the three virtual machines in the backend pool will respond.
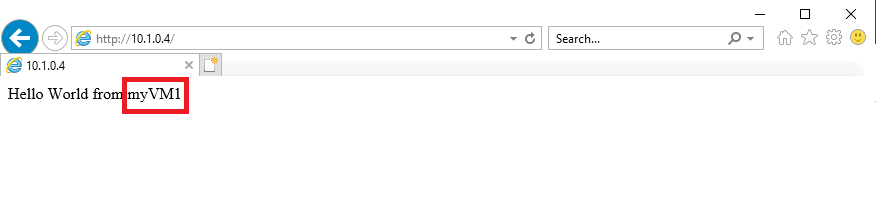
-
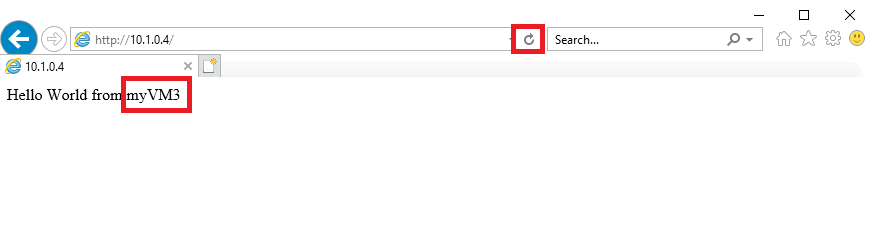
If you select the refresh button in the browser a few times, you will see that the response comes randomly from the different VMs in the backend pool of the internal load balancer.
Task 5: Use Functional Dependency View
-
On the Azure portal home page, under Resources, select myIntLoadBalancer.
-
Under Monitoring, select Insights.
-
This page view is known as Functional Dependency View, and in this view, you get a useful interactive diagram, which illustrates the topology of the selected network resource - in this case a load balancer. For Standard Load Balancers, your backend pool resources are color-coded with Health Probe status indicating the current availability of your backend pool to serve traffic.
-
Use the Zoom In (+) and Zoom Out (-) buttons in the bottom right corner of the page, to zoom in and out of the topology diagram (alternatively you can use your mouse wheel if you have one). You can also drag the topology diagram around the page to move it.
-
Hover over the LoadBalancerFrontEnd component in the diagram, then hover over the myBackendPool component.
-
Notice that you can use the links in these pop-up windows to view information about these load balancer components and open their respective Azure portal blades.
-
On the Insight header bar, select Show metrics Pane to reopen the metrics pane on the right-hand side of the screen.
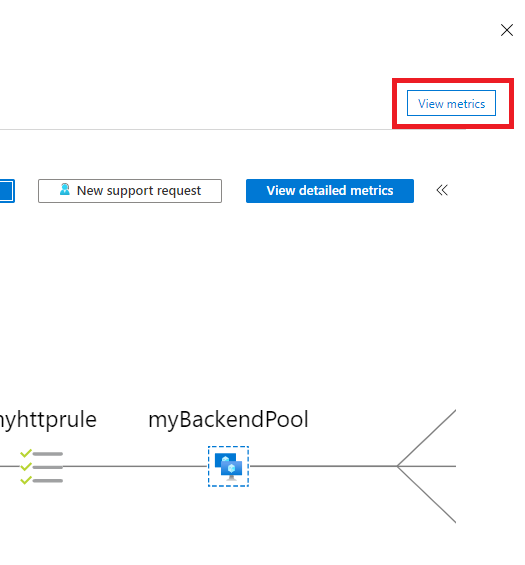
-
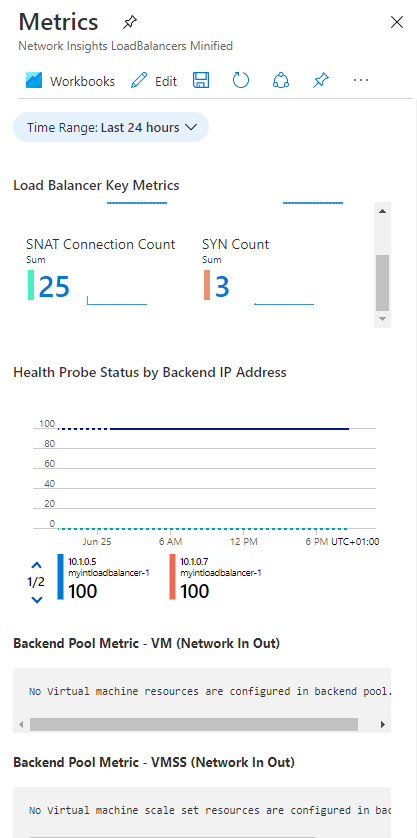
The Metrics pane provides a quick view of some key metrics for this load balancer resource, in the form of bar and line charts.
-
Close the Metric pane.
Task 6: View detailed metrics
-
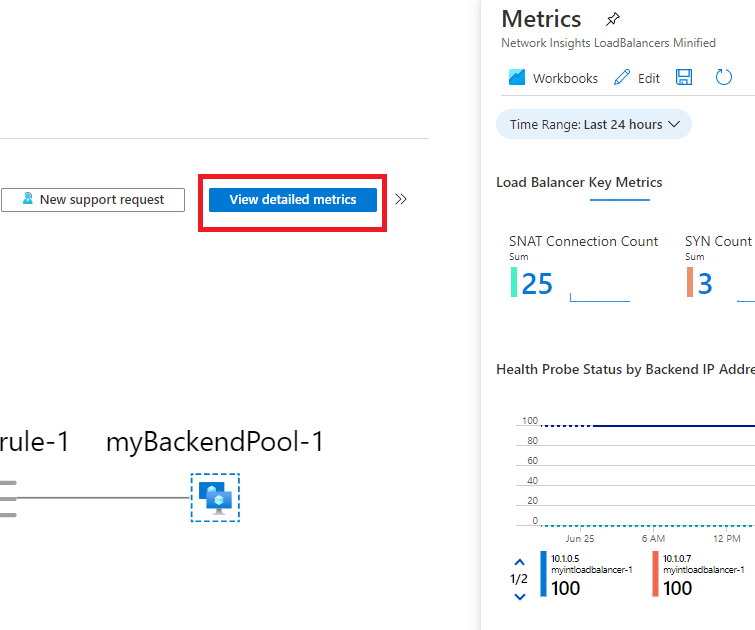
To view more comprehensive metrics for this network resource, select View detailed metrics.
-
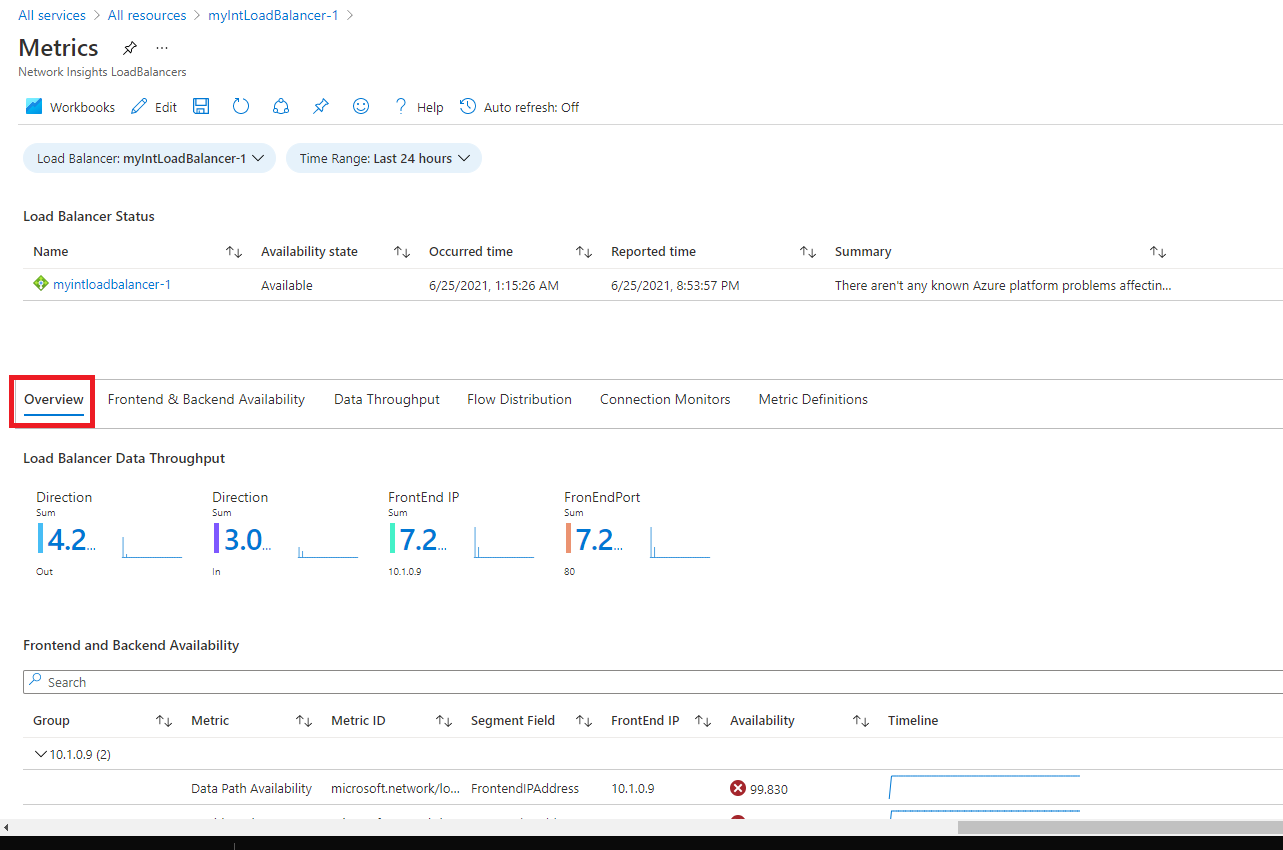
This opens a large full Metrics page in the Azure Network Insights platform. The first tab you land on is the Overview tab, which shows the availability status of the load balancer and overall Data Throughput and Frontend and Backend Availability for each of the Frontend IPs attached to your Load Balancer. These metrics indicate whether the Frontend IP is responsive and the compute instances in your Backend Pool are individually responsive to inbound connections.
-
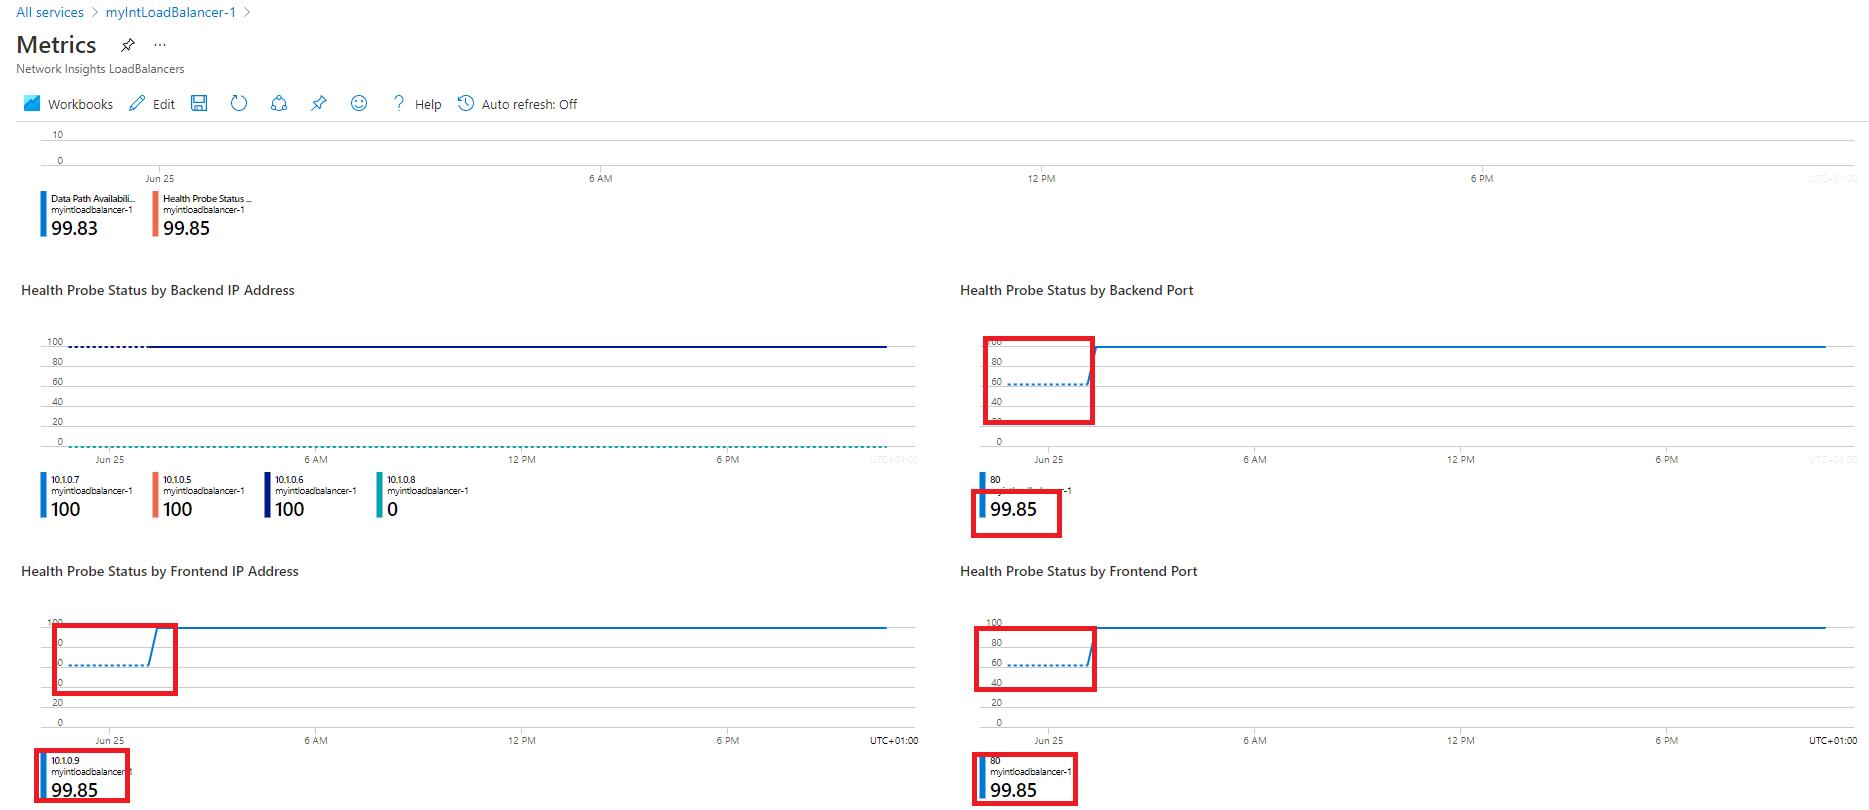
Select the Frontend & Backend Availability tab and scroll down the page to see the Health Probe Status charts. If you see values that are lower than 100 for these items, it indicates an outage of some kind on those resources.
-
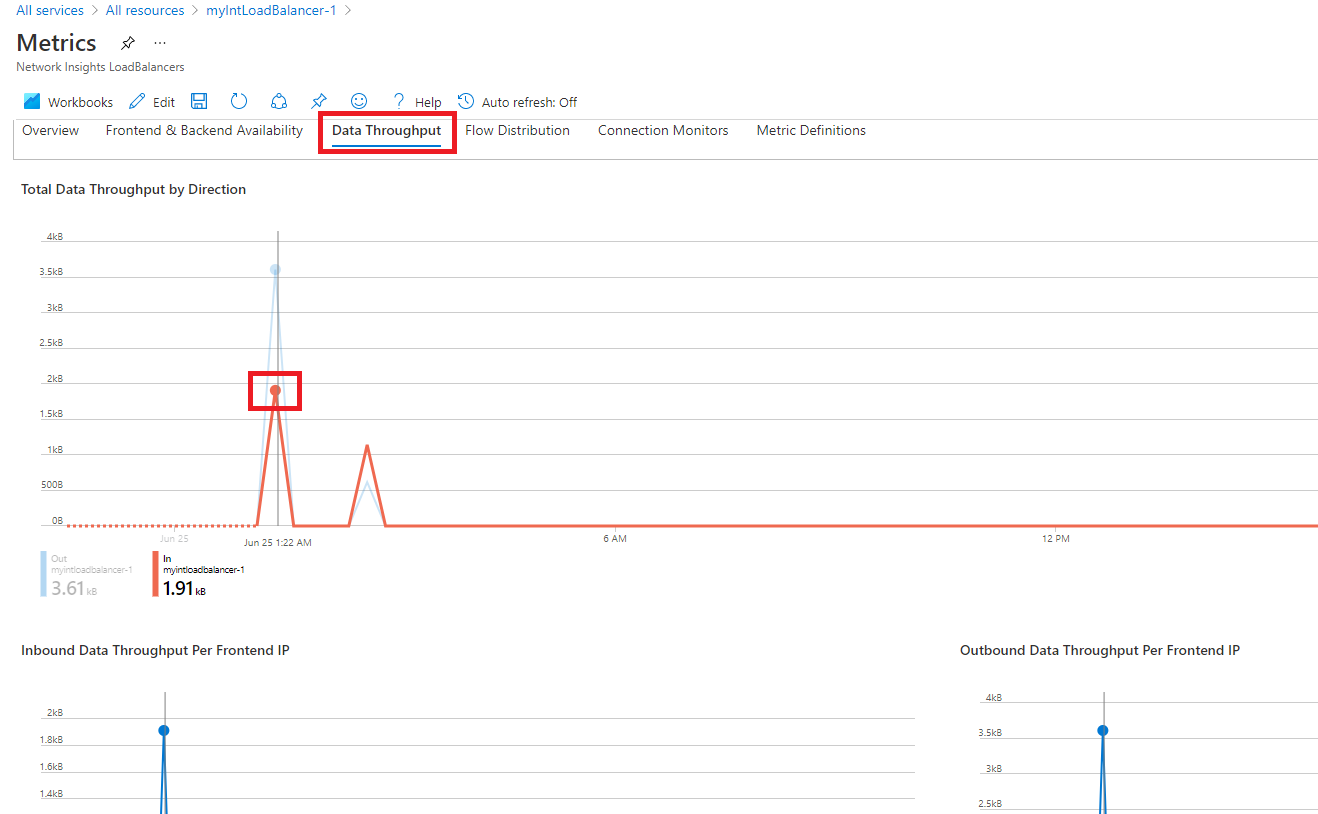
Select the Data Throughput tab and scroll down the page to see the other data throughput charts.
-
Hover over some of the data points in the charts, and you will see that the values change to show the exact value at that point in time.
-
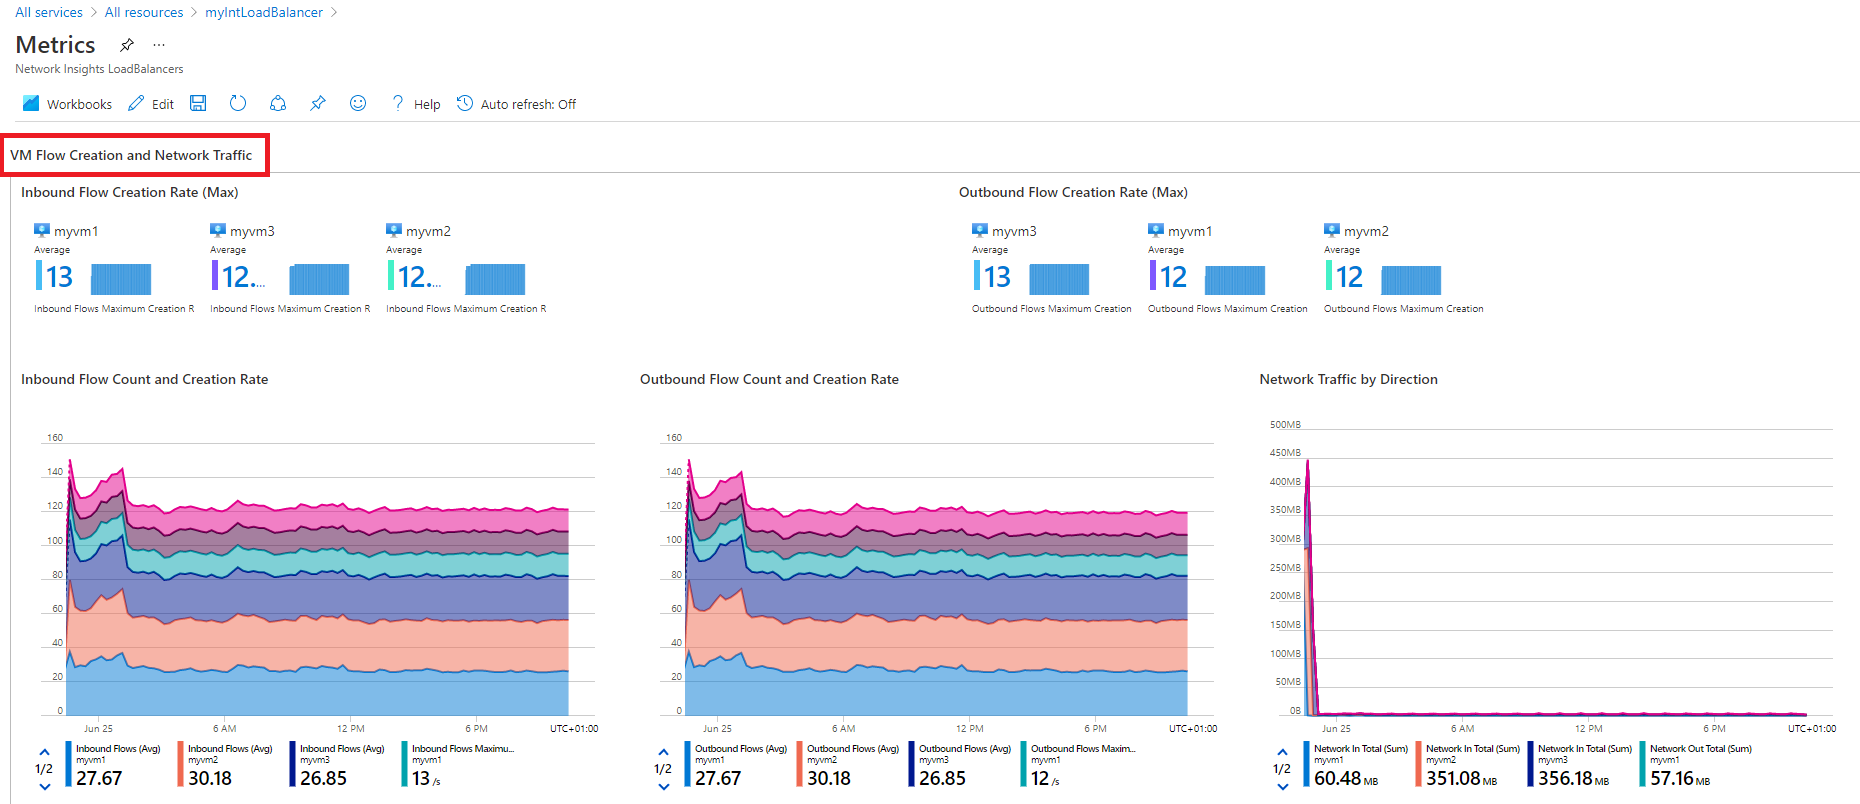
Select the Flow Distribution tab and scroll down the page to see the charts under the VM Flow Creation and Network Traffic section.
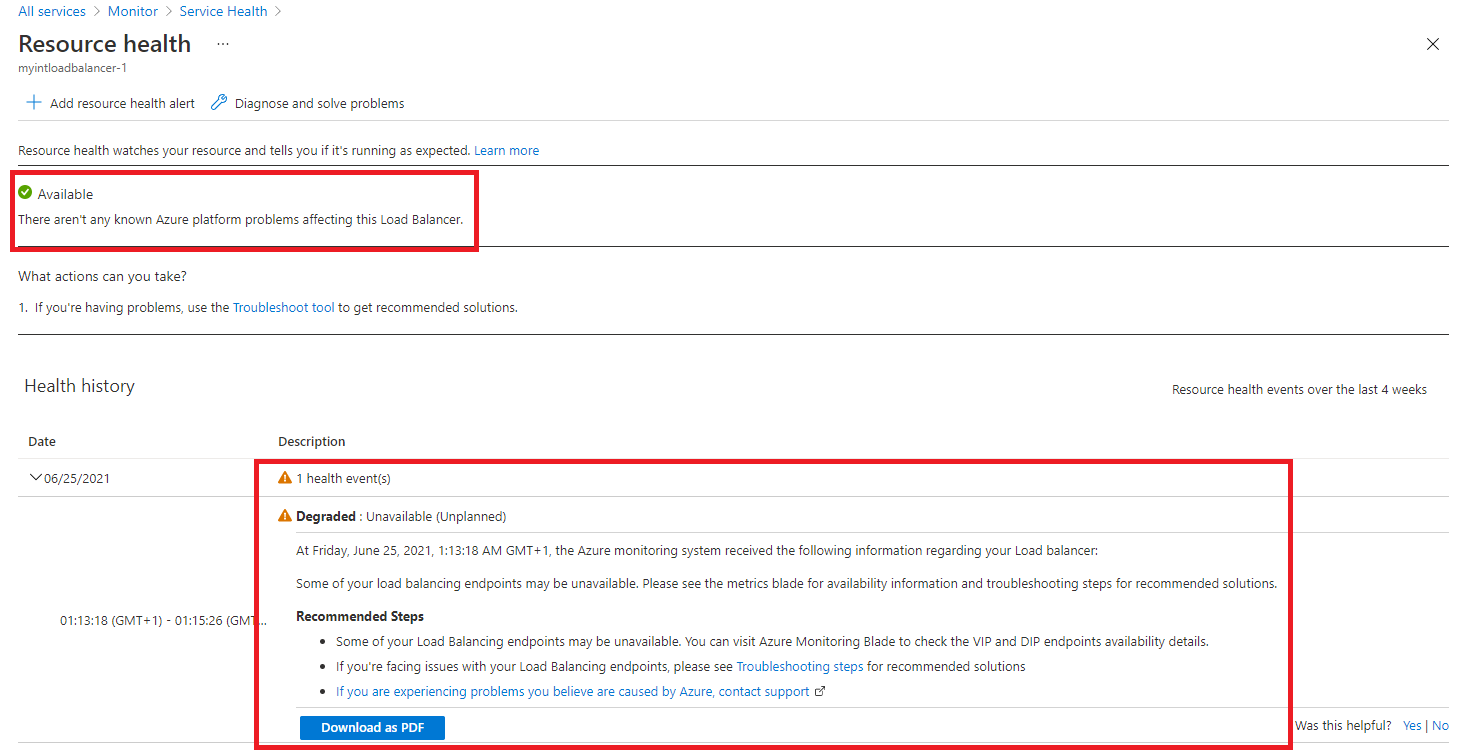
Task 7: View resource health
-
To view the health of your Load Balancer resources, on the Azure portal home page, select More services, then search for and select Monitor.
-
On the Monitor>Overview page, in the left-hand menu select Service Health.
-
On the Service Health>Service issues page, in the left-hand menu select Resource Health.
-
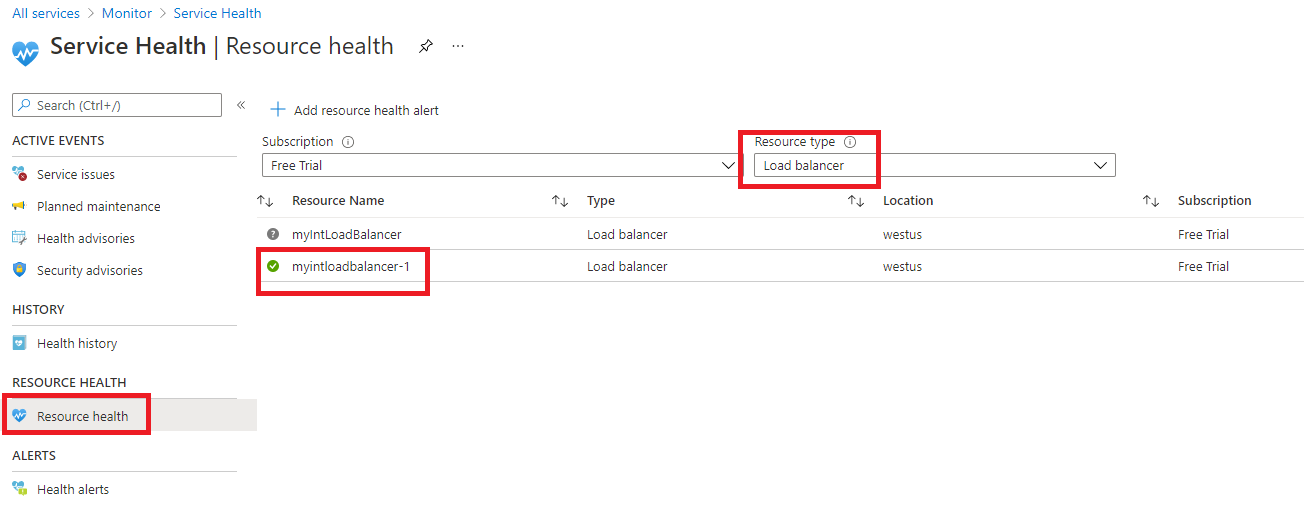
On the Service Health>Resource health page, in the Resource type drop-down list, scroll down the list and select Load balancer.
-
Then select the name of your load balancer from the list.
-
The Resource health page will identify any major availability issues with your load balancer resource. If there are any events under the Health History section, you can expand the health event to see more detail about the event. You can even save the detail about the event as a PDF file for later review and for reporting.
Task 8: Clean up resources
Note: Remember to remove any newly created Azure resources that you no longer use. Removing unused resources ensures you will not see unexpected charges.
-
On the Azure portal, open the PowerShell session within the Cloud Shell pane.
-
Delete all resource groups you created throughout the labs of this module by running the following command:
Remove-AzResourceGroup -Name 'IntLB-RG' -Force -AsJobNote: The command executes asynchronously (as determined by the -AsJob parameter), so while you will be able to run another PowerShell command immediately afterwards within the same PowerShell session, it will take a few minutes before the resource groups are actually removed.